'20/01/12更新:コードを見易くするため、グラフ化の箇所は関数化して分けた。
本記事では、Pythonの多目的最適化のフレームワークのひとつ「Platypus(カモノハシ)」を利用して、その中に含まれるGAアルゴリズムのひとつ「NSGAII(Non dominated Sorting Genetic Algorithms II)」の使用例である。
使用した分析データは、sklearnに含まれている「生理学的特徴と運動能力の関係」である。Python scikit-learn付属の多目的用のデータ「Linnerud dataset」をcsvファイル化する - HK29’s blog
目的関数3つの回帰モデル(回帰式)を各々作成する。作成例は右記リンク先を参照→Python scikit-learnによる交互作用の項を考慮した重回帰分析 - HK29’s blog
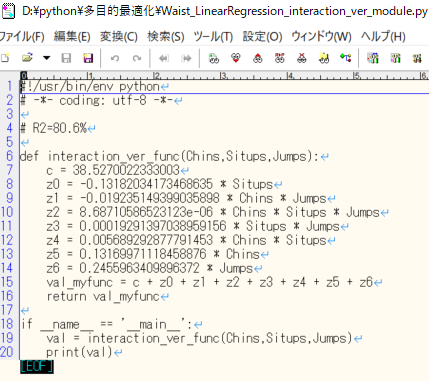
その結果、下図のような線形重回帰分析の回帰式を自作モジュールとして作成する。

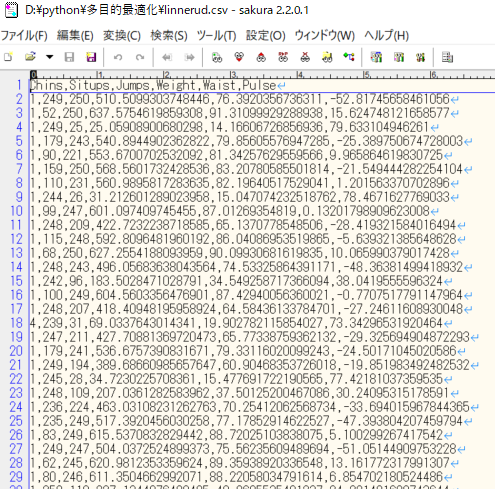
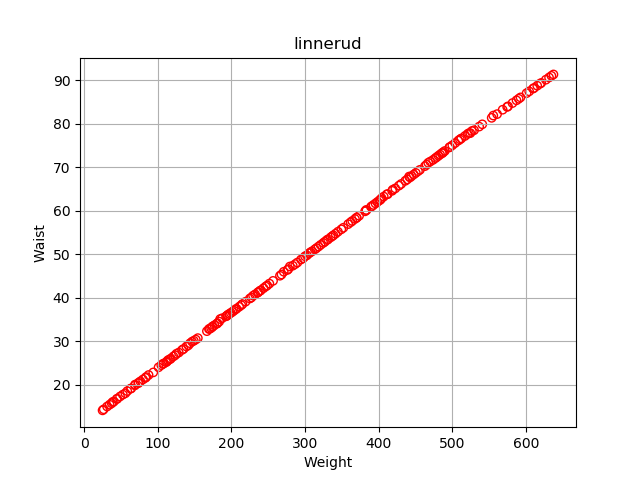
本記事のコードを実行すると下図の3つのファイルを出力する。
1. 各世代で得られた目的値を説明変数と共にcsvファイルに出力する
ねらいの目的値に対して、得られた設計値を知ることが出来る。

2. 複数の目的関数を横軸,縦軸にしてパレート解として可視化
下図は使用したデータが例としてよくなかったが、本来、トレードオフの関係にあるデータを分析すればパレート解まで確認できる。目的関数が3つ以上の場合で、それぞれ可視化したい場合はそれ用に編集する。

3. 全データを散布図にして可視化
一応、上記2がなくても下図で全ての相関関係を視覚的に確認できる。

■本プログラム
#!/usr/bin/env python
# -*- coding: utf-8 -*-
# https://platypus.readthedocs.io/en/latest/getting-started.html#defining-unconstrained-problems
import sys
sys.path.append(".")
import Weight_LinearRegression_interaction_ver_module as myfunc1 # 体重の回帰式
import Waist_LinearRegression_interaction_ver_module as myfunc2 # 腹囲の回帰式
import Pulse_LinearRegression_interaction_ver_module as myfunc3 # 心拍数の回帰式

from platypus import NSGAII, Problem, Real, Integer
import pandas as pd

import matplotlib
matplotlib.use('Agg')
import matplotlib.pyplot as plt
import seaborn as sns

# 目的関数を作成して返す関数:自作モジュールを読み出す場合
def my_function_from_module(vars):
    Chins = vars[0] # x1 懸垂の回数
    Situps = vars[1] # x2 上体反らしの回数
    Jumps = vars[2] # x3 ジャンプ

    objective_function1 = myfunc1.interaction_ver_func(Chins, Situps, Jumps)
    objective_function2 = myfunc2.interaction_ver_func(Chins, Situps, Jumps)
    objective_function3 = myfunc3.interaction_ver_func(Chins, Situps, Jumps)

    return [objective_function1,
            objective_function2,
            objective_function3]

# パレート解を図示する関数
def plot_scatter(algorithm, out_file_name, my_color):
    my_file_name = out_file_name + '_NSGAII'

    x_list = [s.objectives[0] for s in algorithm.result]
    y_list = [s.objectives[1] for s in algorithm.result]

    fig = plt.figure(figsize=(8,8)) #dpi=120)
    ax = fig.add_subplot(1,1,1)
    ax.set_title('Multi-objective optimization', fontsize=14)
    #plt.xlabel("$f_1(x)$")
    #plt.ylabel("$f_2(x)$")
    ax.set_xlabel(my_xlabel, fontsize=16)
    ax.set_ylabel(my_ylabel, fontsize=16)
    if my_xrange:
        ax.set_xlim([my_xrange[0], my_xrange[1]])
    if my_yrange:
        ax.set_ylim([my_yrange[0], my_yrange[1]])
    ax.scatter(x_list, y_list, facecolors='none', edgecolors=my_color,
               label="NSGAII" + '\n  Pareto frontier')
    ax.legend(loc='best', fontsize=14)
    ax.grid(which='both')
    ax.tick_params(labelsize=14)
    plt.tight_layout()
    plt.savefig(my_file_name + '_Pareto_frontier.png')
    plt.close()

# 行列散布図を作成する関数
def plot_matrix_scatter(label, DF, my_sequential_colormap):
    print("plot_matrix_scatter ...")
    sns.set(style="ticks", font_scale=1.2, palette=my_sequential_colormap, color_codes=True)
    g = sns.pairplot(DF, diag_kind="hist")
    g.fig.suptitle(label)
    g.fig.subplots_adjust(top=0.9)
    plt.grid(True)
    plt.savefig(label + "_Matrix_scatter.png")
    plt.close()

# 最適化の過程をcsvファイルに出力する関数(この中で行列散布図の作成する関数も呼び出す)
def create_Summary_data(Chins,
                        Situps,
                        Jumps,
                        algorithm, my_sequential_colormap):
    my_file_name = out_file_name + '_NSGAII'

    column_name_list = ['Chins', 'Situps', 'Jumps',
                        'Weight', 'Waist', 'Pulse']
    column_name_list = ','.join(column_name_list)
    row_list=[]
    with open(my_file_name + '.csv', 'w') as f:
        f.writelines(column_name_list)
        f.write('\n')
        for i in range(len(algorithm.result)):
            row_list.append(Chins.decode(algorithm.result[i].variables[0]))
            row_list.append(Situps.decode(algorithm.result[i].variables[1]))
            row_list.append(Jumps.decode(algorithm.result[i].variables[2]))
            row_list.extend(algorithm.result[i].objectives[:])
            print('NSGAII epoch' +str(i+1) + ' -> ' + str(row_list))
            row_list_str = ','.join(map(str, row_list))
            f.writelines(row_list_str)
            f.write('\n')
            row_list=[]
    df = pd.read_csv(my_file_name + '.csv')
    plot_matrix_scatter(my_file_name, df, my_sequential_colormap)

# メイン関数:platypusフレームワークによる多目的最適化
def main(my_color, my_sequential_colormap):
    problem = Problem(3, 3) # define 3 inputs and 3 objective (and no constraints)
    problem.directions[:] = [Problem.MAXIMIZE,
                             Problem.MINIMIZE,
                             Problem.MINIMIZE] # Problem.MINIMIZE

    Chins = Integer(1, 17)		# x1
    Situps = Integer(50, 250)	# x2
    Jumps = Integer(25, 250)	# x3

    problem.types[:] = [Chins,
                        Situps,
                        Jumps]

    problem.function = my_function_from_module
    print(problem.function)

    algorithm = NSGAII(problem, 200) # 200 is the population size
    algorithm.run(10000) # evaluation number
    print(algorithm)
    plot_scatter(algorithm, out_file_name, my_color)
    create_Summary_data(Chins,
                        Situps,
                        Jumps,
                        algorithm, my_sequential_colormap)

# パラメータの設定
if __name__ == '__main__':
    # parameter
    out_file_name = 'linnerud'
    my_xlabel = 'xlabel'
    my_xscale = 'linear'
    my_xrange = () # グラフのレンジを設定。空タプル()でAuto
    my_ylabel = 'ylabel'
    my_yscale = 'linear'
    my_yrange = (0, 100) # グラフのレンジを設定。(最小値, 最大値)

    my_colors = ["r", "g", "b", "c", "m", "y", "k", "w"]
    my_sequential_colormaps = ["spring", "summer", "autumn", "winter", 'bone',
                            "copper", "plasma", "magma", "cividis", "hsv"]

    # call function
    main(my_colors[0], my_sequential_colormaps[0])

    print('finished')
●参考リンク
●関連リンク
以上
<広告>
リンク